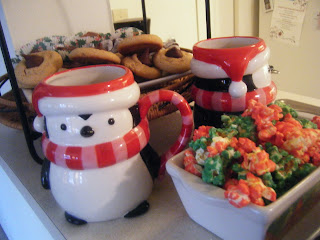
Red and Green Popcorn with Chocolate Dipped Rice Krispies

Wednesday, December 29, 2010

These are two of my favorite Christmas treats to make because there is hardly any work to do. Plus, who doesn't love something covered in chocolate?! 

Chocolate Dipped Rice Krispies:

You can guess the ingredients. 

I start with one of those large sheets of rice krispie treats... 


And cut it into sticks. I got about 50 out of this one sheet.


Melt some milk or dark chocolate using the glass bowl/microwave method. You can always use a double boiler if you have one. Dip and sprinkle. Or not. Thats the great thing about these. Drizzle with red chocolate or cover in candies or crushed cookie... the options are endlessly delicious ;)


The Red and Green Popcorn is a favorite of many of the recipients of my treats. My brother tried it for the first time this year and he took a big bag home after dinner.

INGREDIENTS:

2 bags of buttered microwave popcorn
1/2 pound red chocolate
1/2 pound green chocolate
2 brown paper bags, grocery size

1. First pop the first bag of popcorn and pour in a bowl. Put the popcorn in the paper bag and leave the kernels in the bowl.


2. Melt the red chocolate in the microwave in a glass bowl. When melted through, pour in the bag with the popcorn. Fold over the top and shake!!!

3. Spread over a sheet pan and let cool.


4. Do the same with the green chocolate, the second bag of popcorn and the second brown bag.


Once it's cooled you can break it up a little bit and mix the two colors together. The sweet and salty is so good and looks really cute in a bowl. And, again, you can do any colors you'd like for any holiday you'd like!


Too cute! I bet little kids would love this!

Christmas Spread

Tuesday, December 28, 2010

Can you believe Christmas is over? It's like it never happened! But I have pictures so I know it DID happen! Check out some goodies I made this year!


A cookie platter with peanut butter balls, Oreo chocolate chip cookies, chocolate coconut balls, chocolate covered rice krispie treats and a cookie made by my step sis.


Yum!


Check out the red and green popcorn! LOVE that stuff!


And if you were a good boy or girl this year you may have gotten a goody basket or box!


Recipes to come for fudge, peanut butter balls, chocolate covered rice krispies and red and green popcorn!!! Promise!!!

Peppermint Bark on Christmas Eve

Friday, December 24, 2010

I really wanted to make this last year and never got around to it. I made the Halloween Bark a few months ago and couldn't get this off my mind. I love peppermint and I love chocolate so every year I buy a huge bag of those peppermint bark squares. It's gone already and I need my fix!

INGREDIENTS

Milk Chocolate
White Vanilla Chocolate
Peppermint Extract
Crush Candy Cane
*I did not measure the chocolate because it was bought by the ten pound bag but, if I had to estimate I used about a pound and a half of each. I spread the circles on the sheet pan and estimated how much I needed to melt for a good layer. :)


1. In a microwave safe bowl, heat and melt the milk chocolate. One minute, stir, 30 seconds, stir, repeat until smooth.

2. Spread the milk chocolate over a foil covered sheet pan.

3. Melt the vanilla white chocolate using the same method as step 1. I say vanilla white chocolate because it tastes better than regular white chocolate. Less waxy. Once melted add 2-3 drops of peppermint extract and mix.


4. Spread the vanilla white chocolate over the layer of milk chocolate.

5. Sprinkle over the crushed candy cane. Let cool on the counter for an hour or so or put in the fridge.


6. Break!


I'm giving this as a gift this year too. I'm making goody baskets and boxes and this is an awesome Christmasy addition!

It's A Cookie Exchange!

Monday, December 20, 2010

Do you know what a cookie exchange is? You should. A group of people get together and each pick a cookie. Each one cranks out a dozen for each participant plus one to share (don't forget yourself!) Then we get together and trade. You get a dozen cookies from each person and when you pass the cookie platter at your family Christmas they think you must have slaved away for days baking all those different cookies! It's tricky... and fun. 


This year I made Oreo Chocolate Chip cookies (recipe here). They were a hit! And yummy!


Here is a pic of my stash. 10 different kinds of cookies. There were chocolate chip, sugar, brownie bites, snowballs, pound cake, and peanutbutter kiss cookies just to name a few.


Go ahead, drool.


Do you love it? I do. My stepmom has been doing it since I met her (I hear it's been about 20 years!) and I wouldn't miss it!

Happy Baking!

Creamy Chicken Noodle Soup

Monday, December 13, 2010

I know I know. I haven't been a very good blogger lately. Going at least a week between blogs, it's sad and I'm sorry. I have things to post, but, here is my excuse: Holidays means longer days at work and December means long days, at least six days a week at work.  Looking forward to January like you wouldn't believe. Anywho, onto the good news, I got a slow cooker!!!

If you live in Michigan right now, I know you would definitely appreciate something warm for dinner! It's hard to believe we have this much snow already! 


 This soup is awesome and just a tad bit different than normal chicken noodle soup but oh so good!


INGREDIENTS

2 large cooked chicken breasts, shredded
1 whole diced onion
4 stalks celery, diced
1 cup carrots, diced
4 cans or 56 ounces chicken broth
2 cans condensed cream of mushroom soup
2 teaspoons or more of parsley
Salt and pepper
Egg noodles

1. The day before bake your chicken in the oven or use left over chicken from a roasted chicken, grilled legs, whatever. Shred and put in the crock pot.


2. Add in the veggies and spices. I added chopped garlic on a whim. Didn't measure though sorry!


3. Add in broth and canned condensed soup. Stir until combined. 

4. Cook on high for 4 hours or on low for 8. 

Before you serve, boil up some egg noodles if you wish. 


It smelled so good!


Spoon soup over noodles and you have a big warm bowl of comfort!! It wasn't as creamy as I thought it would be but I liked the smooth texture to it and the mushroom soup added some awesome flavor!


Oh and just an FYI, this filled my 4 quart slow cooker and lasted about four days. It was a bit much for two people but I had little problem taking it to work since the men I work with insist on keeping the office freezing!

Also, this recipe was modified from Sandra Lee's Fast Fix Family Favorites recipe book. :)

Swirl Pumpkin Cheesecake Brownie

Friday, December 3, 2010

This is a great treat. Every Thanksgiving my mom makes pumpkin cheesecake and it is (in my opinion) way better than pumpkin pie. Then I found this recipe at Cookie Madness, a blog I frequent, and I had to try it! 


INGREDIENTS

Pumpkin Cheesecake

12 ounces softened cream cheese
6 tablespoons brown sugar
2 tablespoons sugar
3/4 cup canned pure pumpkin
1 large egg plus 2 tablespoons beaten egg (weird huh?)
1/2 teaspoon vanilla extract
3/4 teaspoon pumpkin pie spice
1 1/2 table spoons flour
Brownie

2 sticks butter
1/4 teaspoon salt
1 1/2 cups sugar
3 eggs
1 teaspoon vanilla extract
1 1/2 cups melted semi-sweet chocolate chips
1 cup flour

1. Preheat the oven to 350 and line a 9 inch square pan with foil. (I used an 8 inch square and had a little batter left)


2. Cream the cream cheese and sugars. Add the egg, vanilla, pumpkin and spice. Slowly add the flour and set aside. 


3. In a separate bowl cream butter, salt and sugar. Add in eggs and vanilla. 

4. In a microwave safe bowl (glass) slowly melt the chocolate chips. I do 30 second bursts in the micro followed by stirring for 30 seconds.


5. Add chocolate to the butter, salt and sugar bowl (from step 3). Stir in the flour with a scraper or spoon.


6. Pour all but a cup of the brownie batter into the foil lined pan. Top with all the cheesecake batter. Plop in the last of the brownie batter on top in a wave pattern. Swirl with a knife if desired! 


7. Bake for 50 minutes. The cheesecake will still be jiggly but the brownie batter will be set. It's hard to tell but take a good look at it and give it a gentle jiggle. :)

Refrigerate for at least a few hours. I did mine over night and it was perfect!


The pumpkin cheesecake brownie was a huge success and so freakin delicious I will make it again before Christmas!


 See, it's not too late to use that extra can of pumpkin in your pantry!

Fall Cookie Basket

Friday, November 26, 2010


My boss gave me an unbelievable task: take $50 and get us 7 centerpieces, name tags, three gift bags and place cards for the holiday party for the employees. Um... what?

But, since I'm crafty, and also thrify, I realized how cheap it would be to make cookie baskets!

I used my usual sugar cookie recipe. Pretty simple. Stuck a stick in them when still warm and sat down ant thought.

I wanted to do the whole veins in a leaf type thing but the first one I made was... kindergarten scribble.


So instead I covered them in colored royal icing and then the same color sugar. Dry, wrap, done. :)


Onto the baskets, if you've never made a cookie basket, they're really simple. All you need are a few simple things:

Baskets
Zip bags
Rice
Floral foam blocks
Tissue paper
Cookies on a stick!


I put three cups of UNCOOKED rice in a zip bag and in the bottom of the basket.


Then I cut a foam block (they look like bricks and may need to be cut to size) and squeeze it into the basket. Since the baskets I got taper at the bottom this was easy. If your baskets don't taper you can use some ribbon, stick it through the bottom of the basket, wrap it around the rice and foam, back down out of the bottom of the basket and tie a knot under the basket... did that make sense?!


Anywho, stick in 3 or 4 pieces of tissue paper and stick the cookies into the foam (through the tissue too) and voila! Cookie baskets! 

I guess I didn't get the greatest pic but there are large and small leaves in red, orange and yellow. I know you get the idea! 

We put them on all the tables and then raffled them off at the end of the dinner. Most of the kids who won them didn't get to take them home though... they ate them with their bowling teams!!! Too cute, and yummy!

Oh, and if you're wondering, between cookie sticks, 7 baskets, foam, rice and tissue (I had all the baking ingredients and baggies) it only cost $29 and some of my time. :)

Everything Crusted Chicken

Tuesday, November 16, 2010


Well, I got out my Rachel Ray: 365 cookbook again and found a winner winner chicken dinner!

My recipe is a bit different but delicious!

INGREDIENTS:

Vegetable oil for frying
4 Boneless skinless chicken breasts, thawed
1 1/2 cups italian bread crumbs (you can also use plain)
2 teaspoons granulated garlic
2 teaspoons poppy seeds
3 Tablespoons onion flakes
3 Tablespoons sesame seeds
1/2 Cup flour
2 Eggs


1. Heat oil to medium high in a skillet.

2. In a wide deep bowl, mix bread crumbs, garlic, poppy seeds, onion flakes and sesame seeds. Set aside.

3. In another bowl put flour and in a third bowl whisk eggs with a splash of water.


4. Dip chicken in the following order: flour, egg, crumbs. Make sure to coat evenly in each bowl. Fry in an inch or so of oil on each side until cooked through.


It literally smelled like an everything bagel in my kitchen! Now, in Rachel Ray's recipe she stuffed the chicken with scallions and cream cheese but I thought it was bad enough to fry it in oil so I skipped it  and had a scoop of mac and cheese instead!

So easy and delicious. Not sure what else to use the sesame seeds or poppy seed for but at least I know I'll be making this chicken again!

Halloween Candy!

Friday, November 12, 2010

I know I know. It seems like Halloween was forever ago. Especially with retail stores completely skipping Thanksgiving and already decorating for Christmas and "leaking" their holiday super sale items. 

But, I had to share this simple treat I made for Halloween. I've seen it all over the foodie blogs and some people are using it as a way to get rid of their left over candy. Either way, it's yummy!


INGREDIENTS

1 1/2 melting chocolate
Any candy or cookies


1. Melt your chocolate either in a double boiler or in a glass bowl in the microwave using 30 second intervals.

2. Just before your chocolate is completely melted, chop up your treats. I used three Oreo cookies, one king size Butterfinger, one king size Reese's, and half of a large bag of fall colored M&M's.

3. Cover a baking pan with foil like in my first pic. Pour in completely melted chocolate and spread over the entire bottom. Immediately sprinkle on your candy.


4. Let cool completely and then break into bite size pieces! 


Here is a complete view of the Halloween treat table we had at my mom's! Yes that's my birthday cake in the middle. :) Carrot cake with cream cheese frosting!


Chocolate covered peanut butter balls made into spiders and green witch fingers!


And for dinner we made monster face pizza for the kids and...


Scary pizza for the adults!


Too cool right?!


Anywho, save for next year or change to fit your next event. With a cookie cutter you can make any shape cheese cutout and with a change of candy you can make peppermint chocolate bark or call it Thanksgiving bark. It works! The colors fit! Get rid of that Halloween candy!

Who doesn't love candy, chocolate and pizza?!

Any Excuse to Eat! Copyright © 2009 Designed by Ipietoon Blogger Template for Bie Blogger Template Vector by DaPino