Chocolate Covered Dried Cranberries

Sunday, May 30, 2010


Sometimes I just crave a SNACK. One of my favs is well... anything chocolate covered. Lately I've been putting dried cranberries in everything from my cereal, granola, chicken salad and now... my melted chocolate. So simple, why didn't I think of it before?!


No measurements today, I guessed and just added more cranberries. As for ingredients, milk chocolate and dried cranberries. 


When I melt chocolate I skip the double boiler as often as I can and just microwave it in a glass bowl. Simple. 


Stir, spread on parchment paper and... they never made it to a fancy bowl to take a nice picture of... I ate them. Barely dried. And it was delicious! 


More snacks to come... I'm thinking chocolate covered popcorn next!!!

Caramel Filled Cupcake

Tuesday, May 25, 2010


Now doesn't that just look delish?!

It took two days to make... seriously. But it was worth it. My boss loves caramel so for his birthday I figured I'd bring in some cupcakes... caramel filled cupcakes! And even though they took two days to complete, they are quite simple!!

First the...

Caramel Filling:
INGREDIENTS

1 can of sweetened condensed milk
4 TBSP butter

1. First, boil a pot of water. Once boiling, lower the temp to simmer and submerge the whole can of condensed milk in the pot of simmering water. Make sure there is at least 2 inches of water over the top of the can. Put a lid on the pot and simmer for 3-5 hours. I did three, wish I had done 5 (assuming it would have thickened it a bit)


2. Once done, take the can out of the pot and allow to cool overnight.

3. Open can and mix with melted butter. Whisk well.


This was awesome and would make a great ice cream topping!!


For the cupcakes, I did a semi-homemade thing... they're from a box. Just follow directions! :)


Then I use a small round cookie cutter to hollow out my cupcakes. Just press in, flip onto it's side and pull out!

Like so!


Once all the cupcakes are hollowed out, fill with your caramel almost to the top.


Then I pull a bit of the cupcake off the top (thin it a bit) and place the rest of the top back on the cupcake. At this point I put them in the fridge to set the cake and caramel a bit.


My favorite topping for cupcakes lately is this... Spred N Gloss. I find it at my local baking supply shop and it is delish! It's like a ganache but stays soft like the top of a hostess cupcake.


You just microwave it for 30 sec or until runny and then tip the cupcake in it, let the excess drip off and cover with sprinkles or let dry by itself!


Now the only thing I would have done differently is boil the can of sweetened condensed milk the full five hours. I ate a cupcake and realized the caramel had seeped into the cupcake more that I would have liked. Maybe if it were boiled longer it would be thicker and would have stayed in the center of the cupcake!

Either way, they were a hit and super delicious!

Homemade Mac N Cheese with Chicken Fingers!

Sunday, May 23, 2010


Who wants a comforting, warm meal? I DO!!!!!

I spent all day baking and cooking and concocting today... more posts to follow but the meal that I must post was the dinner I made. Does anyone else look at the kid's menu sometimes and think how good all that food sounds? Well today all I wanted was something off the kid's menu so... Mac N Cheese and Chicken Fingers it is!!!


Chicken Fingers:

INGREDIENTS

3 Chicken breasts
1 Cup Italian bread crumbs
1/2 Cup Parmesen cheese
4 TBSP butter

1. Preheat oven to 350 degrees F.


3. Mix parmesan cheese and bread crumbs in a bowl.

4. Melt butter in a separate bowl.


5. Dip chicken in butter then in the dry mix. Coat all side and put on a baking sheet with parchment paper.


6. Bake for 30 minutes and serve with a great sauce!!


The best part about this recipe is that it's easy! The second best part is that it was sooo moist even when baked that I couldn't wrap my head around it!

YUM!

Mac N Cheese
INGREDIENTS (for two servings)

1/2 pound of dry pasta
2 TBSP butter
2 TBSP flour
1/8 tsp pepper
1/8 tsp paprika
1/8 tsp ground mustard
1 Cup milk
1 Cup shredded cheese (I used a colby jack mix)

1. First, boil pasta, drain and set aside.

2. While boiling the pasta, melt butter on low heat.

3. Add all dry ingredients and whisk until smooth and thick.

4. Turn heat up to medium/lo and whisk in milk. Whisk until thick and creamy.


5. Take off heat, whisk in cheese and pour over noodles.


This was super creamy, had great homemade flavor and I really needed to make twice what I did! Delish!

Enjoy!


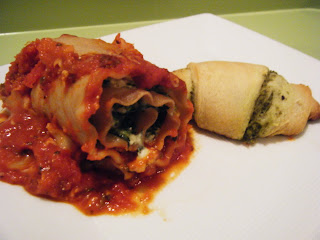
Spinach Lasagna Roll Ups with Pesto Crescents

Monday, May 17, 2010


Recently I realized that my pantry, freezer and fridge are PACKED with food. Yet, on many days I look in there and think, "there's nothing in here to eat". lol. So I started planning meals based on what was in my house the day before and really thinking of COOKING dinner. I know, I know, you're thinking "you have a food blog woman!" and I know, but some days I just don't want to cook.

But today was an awesome semi-homemade inspired day... enjoy!


INGREDIENTS

6 lasagna noodles
12 ounces frozen spinach
1 cup shredded mozzarella cheese
4 ounces cream cheese
1/3 cup parmesan cheese
about 2 cups pasta sauce

Crescent roll dough
1/2 cup pre-made pesto

Here are the things I found in my pantry and fridge and decided to make into a great meal!!

Pesto Crescents:

1. Open crescent rolls and preheat oven to the described instructions.

2. Lay out crescents and spread a layer of pesto on each.


3. Roll each and place on a baking sheet. Set aside. (Or bake now for 10-12 minutes depending on instructions and set aside while the rest is cooking)

Spinach Lasagna Roll Ups:

1. Boil a pot of water and cook noodles to al dente. Rinse with cold water to stop the cooking process.

2. Microwave the spinach for about 1 1/2 minutes. Put on a paper towel and drain out all the liquid.

Like so.

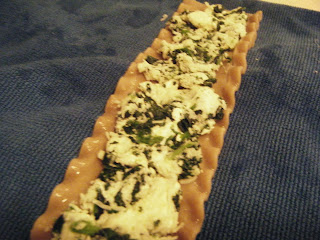
3. Mix spinach, room temperature cream cheese, mozzarella and parmesan cheese.


Looks delicious already!


4. Spread the mixture over the length of a lasagna noodle.


5. Pour some of the sauce into a baking dish to just cover the bottom.

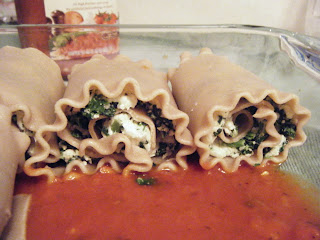
6. Roll up noodles with filling and place seam side down in the dish.


7. Cover with the rest of the sauce and add cheese if you desire (who doesn't love more cheese?)


8. Bake at 350 degrees F for 30 minutes. 20 minutes in is when I put the crescents in to cook.


The crescents with pesto smelled soooo good when they came out!!


Serve!

These were awesome! The filling was my favorite part! Very creamy and cheesy and the pesto in the crescents added a nice flavor to a boring old side!! This is what I ate... for my first serving!!

Banana Peanut Butter Chocolate Chip Muffins... with Honey!

Tuesday, May 11, 2010


Holy cow... do you see these??

I'm not usually a muffin person but the title swayed me to try them and they're amazing! I thought they might need a glaze or something but they're really flavorful all on their own!

INGREDIENTS

3 ripe bananas
1/3 cup melted unsalted butter
1/3 cup peanut butter (I used smooth)
2 Tablespoons honey
1 teaspoon cinnamon
1 teaspoon nutmeg
1 teaspoon vanilla
1 egg
1/2 cup sugar
1/2 cup brown sugar
1 1/2 cups flour
1 teaspoon baking soda
1 1/2 cups chocolate chips


This recipe is so easy...

1. Preheat the oven to 350 degrees F. Mix banana, butter, peanut butter, honey, egg, spices and sugars. Do not over mix.

2. Add in baking soda and flour slowly, scraping the sides of the bowl. Mix only until combined.

3. Slowly stir in chocolate chips by hand.


4. Scoop into baking cups or a greased muffin tin.

5. Bake for 18 minutes or until golden.

I also sprinkled some sugar on top of some to see how it came out. Very good but not the same as the large crystal sugar.


These are really rich and moist. I can't wait to have one with some hot cocoa tomorrow morning!!


My Fav Frosting Recipe Ever

Sunday, May 9, 2010

It's been a rough week. I was sick. Then my BF got sick. Then, we had a death in the family. I was asked to make the cake for the funeral luncheon and since he was not very religious and an avid astronomer, I decided to go with a stary night sky theme. With one night to make it, I think it turned out pretty cute. And tasty!


The stars are made of premade fondant. I've always wanted to try to make my own but this was not the time!

And one of my fav tricks for a quick trick to add a little color to cake it the spray food coloring. Perfect for a sky...


I have these in all the colors!


Anyway, my no fail frosting is an easy one! It's non dairy, doesn't get too crusty, is sweet but not too sugary and won't melt in direct sunlight!!!

Try it out and let me know what you think! Add some different flavored extracts and mix it up... I'm thinking of doing blueberry next on some sugar cookies!

Step 1:
INGREDIENTS

1 cup water
1 1/2 cups dry non dairy creamer (like Coffeemate)

The night before, boil the water then add the non dairy creamer. Stir until well dissolved. Put in a container and chill at least 6 hours. I chill overnight.

Step 2:
INGREDIENTS

1 cup of pre-made creamer mixture
1 pound white margarine
2 cups Crisco
1 teaspoon clear vanilla extract
1 teaspoon almond extract
2 pounds powdered sugar

In a mixer, cream together the margarine, crisco and extracts. Once combined, add in the powdered sugar and creamer mixture slowly, alternating between the two.

Mix on a medium speed for about five minutes until light, fluffy and well mixed. Scrape down sides to make sure all powdered sugar gets combined.

This makes enough frosting to cover a half sheet cake, do a top and bottom border and writing. I frost generously.

Also, this can be kept for two weeks in an air tight container on the counter or fridge. It can also be frozen for about six months. Just put in the mixer for a few minutes to liven it up if you choose to do either. I do it regularly so that I always have a lil frosting for cookies, a cupcake or even graham crackers!!

Any Excuse to Eat! Copyright © 2009 Designed by Ipietoon Blogger Template for Bie Blogger Template Vector by DaPino